


G’day! Quick one this time, about a small chore that keeps coming back. You expand Azure VM OS disk space in the portal, or deploy a VM with a bigger disk than the image it came from, and Azure shows the new size. Then you look inside Windows and C: is still the old size, with unallocated space sitting behind it.
It’s not a big problem, just an annoying one. Windows doesn’t extend the partition by itself, and depending on the image, a recovery partition can sit right behind C: and block the extend. So you end up fixing it by hand, one VM at a time.
This post covers why it happens (including an Azure Image Builder gotcha that caught me out), a script that fixes it, and three ways to run it: built into your Bicep deployments, ad hoc against one or two VMs, or across all of them at once. No RDP required for any of it.
Why the disk grows but the partition doesn’t
Azure only ever touches the disk. Whether you resize an existing managed disk or set a larger size at deployment, the partition table inside that disk comes from wherever the OS came from, and nothing on the Azure side reaches into Windows to extend it afterwards.
Deploy straight from a marketplace image and you’ll generally find C: already filling the disk when you first log in, because provisioning takes care of it. Deploy from a custom image, the golden image most AVD estates run on, and nobody takes care of it. The VM boots with the partition layout the image was captured with, full stop.


The Azure Image Builder disk size gotcha
Here’s the bit that actually sent me down this path. I’d assumed that setting a 256 GB disk size in an Azure Image Builder template got me an image with a 256 GB C:. It does not, and this is why.
The osDiskSizeGB you set in an AIB template sizes the build VM’s disk. The partition layout on that disk comes from the marketplace base image underneath, which is built at 127 GB. Nothing in the build extends the partition, so the build VM runs with a 127 GB C: and a pile of unallocated space the whole way through. Sysprep then captures the partition table as it stands. The result is an image with a 256 GB disk but a 127 GB C:, and every session host deployed from it gets the same layout.
So when my supposedly 256 GB session hosts came up showing 127 GB in Disk Management, that wasn’t a deployment fault. The image was built that way.
And the recovery partition problem
There’s one more thing that can get in the way. On a lot of Windows 11 machines the recovery partition sits immediately after the OS partition, and Extend Volume in Disk Management greys out because the unallocated space isn’t adjacent to C:.
Worth being honest here: on the Azure images I tested (a 25H2 AVD base built through Image Builder), the recovery partition sits at the front of the disk, so the extend went straight through every time. But the layout depends on the image, and the after-C: layout is common enough that any script doing this job needs to handle it rather than assume.
When it is in the way, the fix is a documented Microsoft process rather than a hack: disable WinRE with reagentc /disable (which stages winre.wim onto the OS volume), delete the recovery partition, extend C: into the space, then re-enable WinRE with reagentc /enable. WinRE carries on working afterwards, hosted on C: instead of its own partition.
📝 Note
This is the same reagentc process Microsoft documents for resizing recovery partitions (see KB5028997, which walks through disable, delete, resize, re-enable for the WinRE update). On session hosts that get rebuilt from an image every month anyway, the recovery partition is not something worth losing sleep over.
The script
One script covers all of this, and it’s safe to run as many times as you like: on a VM that’s already fine it says so and exits. That makes it safe to build into deployments, safe to re-run, and safe to schedule.
What it does, in order:
- Reports the disk and partition sizes it found, so the output is useful even when there’s nothing to do
- Exits quietly if C: already fills the disk (less than 1 GB unallocated)
- Extends C: in place if the space is adjacent
- If the extend is blocked, checks the blocker actually is a recovery partition sitting after C:. If it’s something else, it stops and tells you, touching nothing
- Otherwise does the reagentc dance: disable WinRE, remove the recovery partition, extend C:, re-enable WinRE
- If anything fails after WinRE was disabled, it re-enables it on the way out
- Exit code 0 means expanded or nothing to do, 1 means it failed
[CmdletBinding()]
param(
    [ValidatePattern('^[A-Za-z]$')]
    [string]$DriveLetter = 'C'
)

$ErrorActionPreference = 'Stop'
$winReDisabledByScript = $false

try {
    $osPartition = Get-Partition -DriveLetter $DriveLetter
    $disk = Get-Disk -Number $osPartition.DiskNumber

    Write-Output ("Disk {0}: size {1:N1} GB, allocated {2:N1} GB. {3}: partition is {4:N1} GB." -f `
        $disk.Number, ($disk.Size / 1GB), ($disk.AllocatedSize / 1GB), $DriveLetter, ($osPartition.Size / 1GB))

    # 1. Nothing to do if the disk is already fully allocated.
    if (($disk.Size - $disk.AllocatedSize) -lt 1GB) {
        Write-Output "$DriveLetter`: already spans the full OS disk - nothing to do."
        exit 0
    }

    # 2. Can the partition grow in place?
    $maxSize = (Get-PartitionSupportedSize -DriveLetter $DriveLetter).SizeMax

    # 3. If not, the recovery partition is in the way - relocate WinRE and remove it.
    if (($maxSize - $osPartition.Size) -lt 1GB) {
        $recoveryPartitions = @(Get-Partition -DiskNumber $disk.Number |
            Where-Object { $_.Type -eq 'Recovery' -and $_.Offset -gt $osPartition.Offset })

        if ($recoveryPartitions.Count -eq 0) {
            Write-Output "Expansion is blocked, but not by a recovery partition - manual investigation needed. No changes made."
            exit 1
        }

        Write-Output "Expansion is blocked by the recovery partition - temporarily disabling WinRE and removing it."

        # Disable WinRE so winre.wim is staged onto the OS volume before its partition is deleted.
        $null = & reagentc.exe /disable 2>&1
        $winReDisabledByScript = $true

        $recoveryPartitions | Remove-Partition -Confirm:$false
        $maxSize = (Get-PartitionSupportedSize -DriveLetter $DriveLetter).SizeMax
    }

    # 4. Extend the OS partition.
    if (($maxSize - (Get-Partition -DriveLetter $DriveLetter).Size) -gt 100MB) {
        Resize-Partition -DriveLetter $DriveLetter -Size $maxSize
        Write-Output ("$DriveLetter`: expanded to {0:N1} GB." -f ($maxSize / 1GB))
    }
    else {
        Write-Output "No usable contiguous space to extend into - no changes made."
    }

    # 5. Re-enable WinRE (now hosted on the OS volume).
    if ($winReDisabledByScript) {
        $null = & reagentc.exe /enable 2>&1
        if ($LASTEXITCODE -eq 0) {
            Write-Output 'WinRE re-enabled (now hosted on the OS volume).'
        }
        else {
            Write-Warning "reagentc /enable returned exit code $LASTEXITCODE - check 'reagentc /info'. The partition expansion itself succeeded."
        }
    }

    exit 0
}
catch {
    # Best effort: never leave WinRE disabled if we were the ones that disabled it.
    if ($winReDisabledByScript) {
        $null = & reagentc.exe /enable 2>&1
    }
    Write-Error "Failed to expand $DriveLetter`: $_"
    exit 1
}⚠️ Important
Run through Azure Run Command this executes as SYSTEM, and removing the recovery partition is one way (WinRE ends up living on C:, which is fine, but the partition doesn’t come back). On stateless session hosts that’s a non-event. On a long-lived pet server, read the script before you point it at anything.
Three ways to expand Azure VM OS disk space
Same script every time, the only question is where to run it from. In increasing order of scale:
Option 1: ad hoc, without logging on
For a VM or two, Azure Run Command does the job without RDP, without WinRM and without installing anything, since it rides the guest agent that’s already on every Azure Windows VM:
Invoke-AzVMRunCommand -ResourceGroupName 'rg-avdvm-01' -VMName 'vm-sh-1' `
-CommandId 'RunPowerShellScript' -ScriptPath .\Expand-OSDisk.ps1A handful of hosts is just a loop:
'vm-sh-1','vm-sh-2','vm-sh-3' | ForEach-Object {
    Invoke-AzVMRunCommand -ResourceGroupName 'rg-avdvm-01' -VMName $_ `
        -CommandId 'RunPowerShellScript' -ScriptPath .\Expand-OSDisk.ps1
}If you’re already in the portal, the VM’s Run command blade (Operations, Run command, RunPowerShellScript) does the same thing: paste the script in and run it. That’s where this one came from:


Option 2: baked into Bicep, so new hosts never need it
Fixing existing VMs is one thing, but new deployments shouldn’t need manual fixing afterwards. In my session host Bicep this is a run command resource behind a switch, so every host sorts its own disk out as part of the deployment.
The script lives inside the template as a variable, one line of PowerShell per array element, so there’s nothing to host anywhere and nothing for the VM to download. It’s the same logic as the standalone script earlier, condensed for embedding:
@description('Expand the OS partition to fill the provisioned OS disk')
param expandOsDisk bool = true

var expandOsDiskScript = join([
  '$ErrorActionPreference = "Stop"'
  '$part = Get-Partition -DriveLetter C'
  '$disk = Get-Disk -Number $part.DiskNumber'
  'if (($disk.Size - $disk.AllocatedSize) -lt 1GB) { Write-Output "C: already spans the full OS disk - nothing to do."; exit 0 }'
  '$reenableWinRE = $false'
  '$max = (Get-PartitionSupportedSize -DriveLetter C).SizeMax'
  'if (($max - $part.Size) -lt 1GB) {'
  '  Write-Output "Expansion is blocked by the recovery partition - temporarily disabling WinRE and removing it."'
  '  reagentc.exe /disable | Out-Null'
  '  $reenableWinRE = $true'
  '  Get-Partition -DiskNumber $disk.Number | Where-Object { $_.Type -eq "Recovery" } | Remove-Partition -Confirm:$false'
  '  $max = (Get-PartitionSupportedSize -DriveLetter C).SizeMax'
  '}'
  'if (($max - (Get-Partition -DriveLetter C).Size) -gt 100MB) {'
  '  Resize-Partition -DriveLetter C -Size $max'
  '  Write-Output ("C: expanded to {0:N1} GB." -f ($max / 1GB))'
  '}'
  'if ($reenableWinRE) { reagentc.exe /enable | Out-Null; Write-Output "WinRE re-enabled (now hosted on C:)." }'
], '\n')

resource expandOsDiskRunCommand 'Microsoft.Compute/virtualMachines/runCommands@2024-03-01' = if (expandOsDisk) {
  parent: vm                        // your existing virtual machine resource
  name: 'ExpandOsDisk'
  location: location
  properties: {
    source: {
      script: expandOsDiskScript    // the embedded PowerShell from the var above
    }
    asyncExecution: false
    timeoutInSeconds: 300
    treatFailureAsDeploymentFailure: false  // best effort: never fails the deployment
  }
}If you’d rather keep the full standalone script as a .ps1 next to the template, script: loadTextContent(‘./Expand-OSDisk.ps1’) does the same job in one line.
Two small decisions worth copying. First, treatFailureAsDeploymentFailure is false, because a disk that stayed at 127 GB is not a reason to fail a session host deployment; it’s a reason to check the run command output afterwards. Second, in the full module this resource depends on the domain join extension, so the join’s reboot can’t interrupt the resize mid-flight. nd because the script does nothing on a disk that’s already right, the switch stays true in every parameter file: a host that doesn’t need it reports “nothing to do” and moves on.
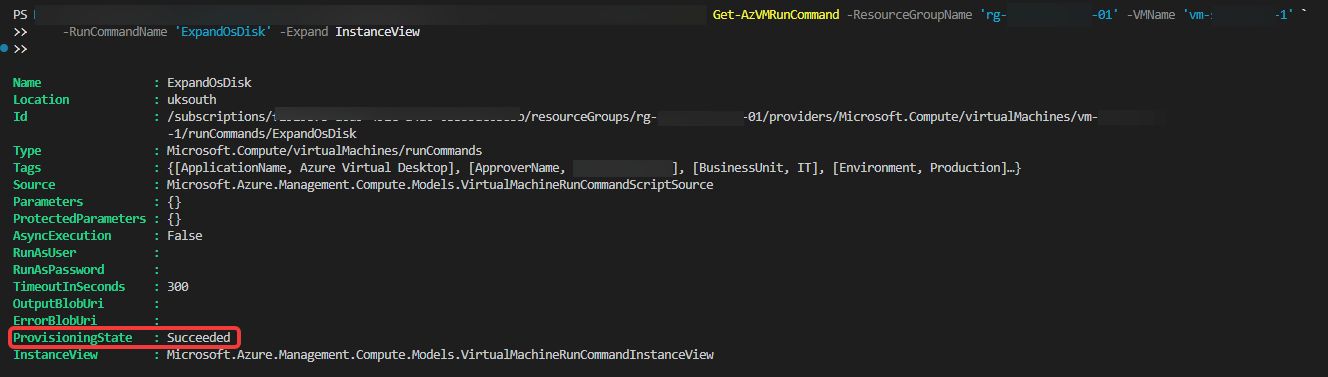
One thing worth knowing: this is a managed run command, so it stays on the VM as a resource after the deployment. Don’t go looking for it in the portal though, the Run command blade only shows the older action style commands. To see what it did, ask PowerShell:
Get-AzVMRunCommand -ResourceGroupName 'rg-avdvm-01' -VMName 'vm-sh-1' `
-RunCommandName 'ExpandOsDisk' -Expand InstanceViewThat returns the resource with its provisioning state, and the script’s output text is under .InstanceView.Output if you want to print it.
Option 3: the whole estate at once
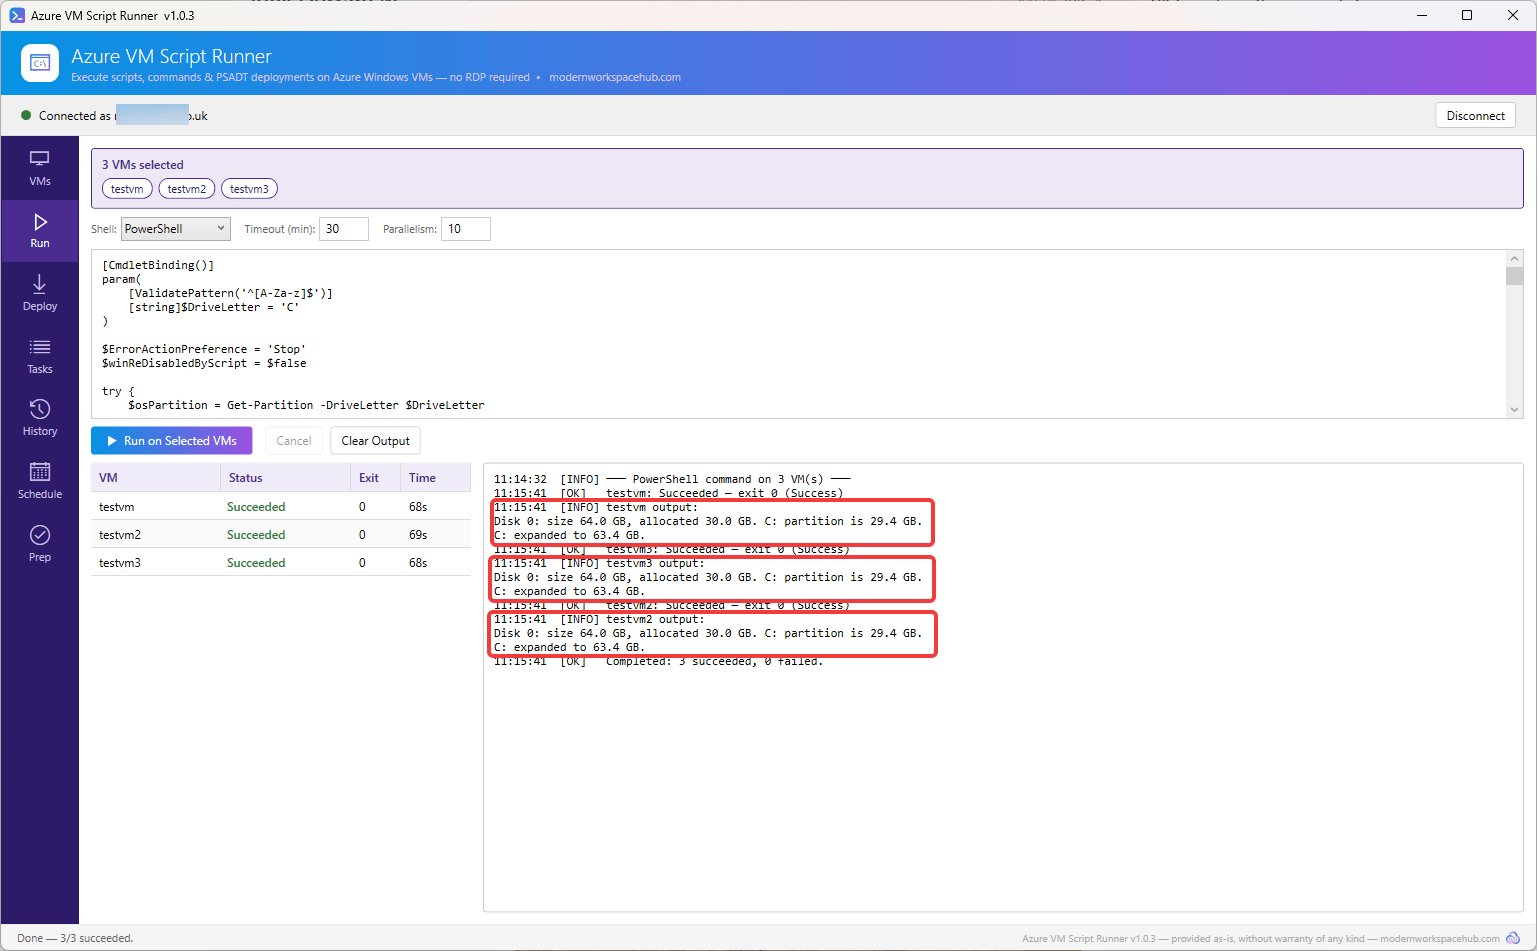
For anything past a handful of VMs, this is exactly the job I built Azure VM Script Runner for: pick the VMs, run the script against all of them in parallel, and read the per VM results in one grid. The disk expansion scenario even gets a mention in that post, because it’s such a natural fit: one idempotent script, pushed everywhere, and the VMs that don’t need it simply say so.
Save Expand-OSDisk.ps1 as a task in the library and it’s a two-click job whenever it comes up. And since Script Runner can schedule tasks through Azure Automation, you could run it monthly across the estate: any VM that’s fine says “nothing to do”, and any disk someone expanded and forgot about gets finished automatically.
If you haven’t seen the tool yet, the full write-up is here:

Or fix the image itself
The long-term answer for golden images is to expand the partition during the image build, so the captured image already fills its disk. The same script dropped in as an early customisation step in the image template does it, and your build steps get the extra space too. I keep both: the image build expands the partition so hosts are right from first boot, and the deployment run command stays on as a safety net for the day someone bumps the disk size in a parameter file without rebuilding the image.
Frequently asked questions
Why is my Azure VM C: drive smaller than the disk? Azure resizes the disk, but Windows never extends the partition on its own. Custom images make it worse: the partition layout is captured at build time, so every VM deployed from the image gets the same layout regardless of the disk size you deploy with.
Why is Extend Volume greyed out in Disk Management? On many Windows 11 machines the recovery partition sits directly after C:, so the unallocated space isn’t adjacent. Relocate WinRE (reagentc /disable), remove the recovery partition, extend, then re-enable WinRE. The script above does exactly that, and only when it’s actually in the way (on the Azure images I tested, it wasn’t).
Is removing the recovery partition safe? WinRE is re-enabled at the end, hosted on the OS volume, so recovery features keep working. It’s the same process Microsoft documents for resizing recovery partitions. On session hosts rebuilt from an image every month it’s a non-issue.
Does any of this need downtime? No. The partition extends online, nothing reboots, and users on a session host won’t notice. The only reboot anywhere near this process is the domain join one during deployment, which is why the Bicep version runs after it.
Wrapping up
That’s it: one script, and three places to run it from depending on how many VMs are involved. Build it into Bicep and new hosts never have the problem, keep it handy for ad hoc fixes, and if you’ve got a lot of VMs, Script Runner or a schedule takes care of the rest. Nothing dramatic, just one less thing to do by hand.
The script and the Bicep module it lives in are the same ones I run in production, so if you spot an edge case they don’t handle, let me know in the comments. Happy resizing! 😁

